The Technician Application (Mobile Tech) allows technicians to interact with Q360 on mobile devices such as tablets, to interact with call and task records including when they are disconnected from the Internet.
To access from the mobile device, go to https://[yourdomain.com]/mobiletech, where [yourdomain.com] is the URL to access Q360.

With the Mobile Tech app, technicians can do the following:
- View assigned tasks and calls
- Start/Stop travel and on site time bills
- Enter events on tasks and calls
- Take signatures on calls and tasks
- Use technician inventory on calls
- Work offline when Internet connectivity is unavailable
- Update check lists and add check lists
- Service managers can also track GPS coordinate of technicians while the app is active on mobile devices
Technical requirements
- Users requiring access must have one of the following types of licenses:
- ADMIN
- MOBILETECH
- TECH
- USER
- Android tablet 8″ or larger (recommended)
- Chrome web browser not running in incognito mode
- SSL certificate installed on the web server/web client
- The following MIME mappings must be setup in IIS
- .otf – font/otf
- .json – application/json
- .woff – font/x-woff
- .webmanifest – application/manifest+json
- .woff2 – application/font-woff2
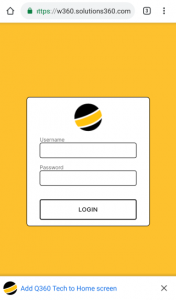
Install the Technician App
To install the Technician App, complete the following steps:
- From the mobile device, go to https://example.com/mobiletech, where example.com is the URL of your web client instance.
- When prompted, select Add Q360 Tech To Home Screen. This installs a shortcut to the home screen on the mobile device.
- Close the web browser on the mobile device.
- Log in to the Technician App from the app added to the home screen.
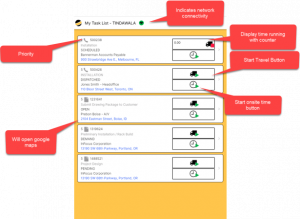
Work with Task Lists
Technicians can work with task list in the following ways:
- The time bill button can be stopped and started. The icon will changes to indicate running time allowing you to stop time. When time is running it will show total running time as well.
- Starting another time bill will stop previous time bill
- Tap on the address hyperlink to launch Google Maps
- Tap on the item hyperlink to view the task item details
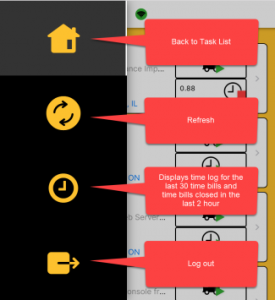
Task List Swipe Right Menu
To activate the right menu, swipe right on the left side of the screen.
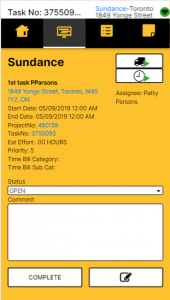
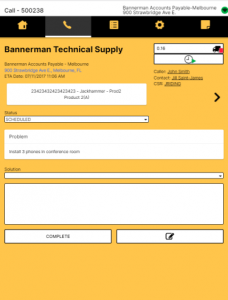
Call Screen
The Call screen allows users to do the following:
- Change the call status
- Mark a call a complete
- Capture a customer signature
- Display caller/contact information by long pressing on the name
- Click the right arrow pointing to the right to view additional call header/detail information
Note that there is no save button. Whatever is edited is automatically saved.
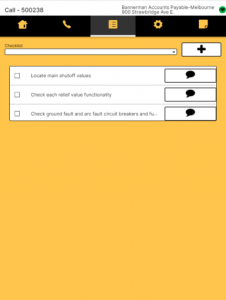
Call Check List Screen
The Call Check List screen allows users to do the following:
- Check boxes to complete list items
- Enter additional item comments and set the result code (tap the dialogue icon)
- If a check list is not attached to the call and you want to add one or replace existing one using the following steps:
- Click the drop-down box to select a check list.
- Click the Add icon to the right.
- Click OK to confirm.
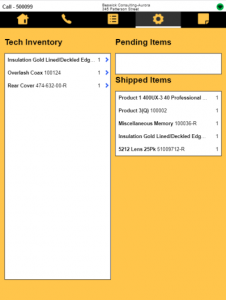
Call Parts Tab
The call parts tab displays what is already booked on the call and the technician inventory to book additional items against the call.
- Tech Inventory displays a list of parts available in technician inventory.
- Single tap moves 1 qty to Pending Items
- Long press displays quantity spinner to add multiple quantities of an item
- Pending Items displays list of item added to the call and are not registered to the main database until the call is marked complete on the call main page
- Shipped Items displays a list of items already on the call regardless of the status from the Call form Parts tab.
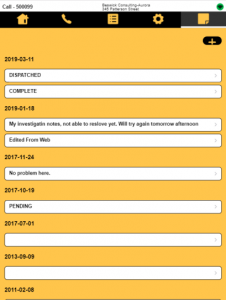
Call Events Page
This section allows users to view existing events grouped by date. To add a new event, tap the Add icon.
Task Screen
This section functions similar to call page without the Parts tab.